Connecting Starlink with our product PCWL-0500
The year 2024 has begun.
This year has seen a series of catastrophes, including the earthquake on the Noto Peninsula early in the New Year and a plane crash at Haneda airport. It was the start of a new year in which we keenly felt the regrettable loss of precious lives due to natural disasters and unforeseen accidents. We would like to express our deepest sympathies to those who have been affected by the disaster and are still forced to live in inconvenience.
The use of satellite communication systems as a bridge until the restoration of information and communication networks affected by the disaster was in the news. We believe that our technology can also contribute to building Wi-Fi areas in evacuation centres. We do not have the physical strength of a large company, so we have our limitations, but if our products can help you in any way, please let us know.
This New Year's Day, I installed Starlink, a ground-breaking innovation in satellite communications, at home and connected it to our product PCWL-0500. In this blog, I would like to describe the setup procedure and my impressions of using it. The Starlink antenna (CPE) obtained this time is a rather large one, known as a high-performance type; it arrived in a 70x60x25 cm packing box.
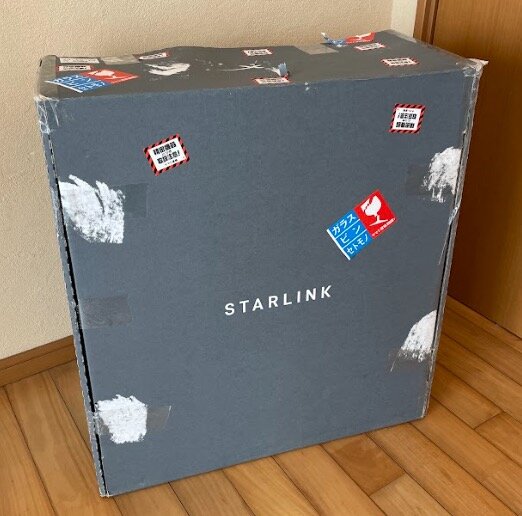
PHOTO: STARLINK HIGH PERFORMANCE ANTENNA KIT PACKING BOX
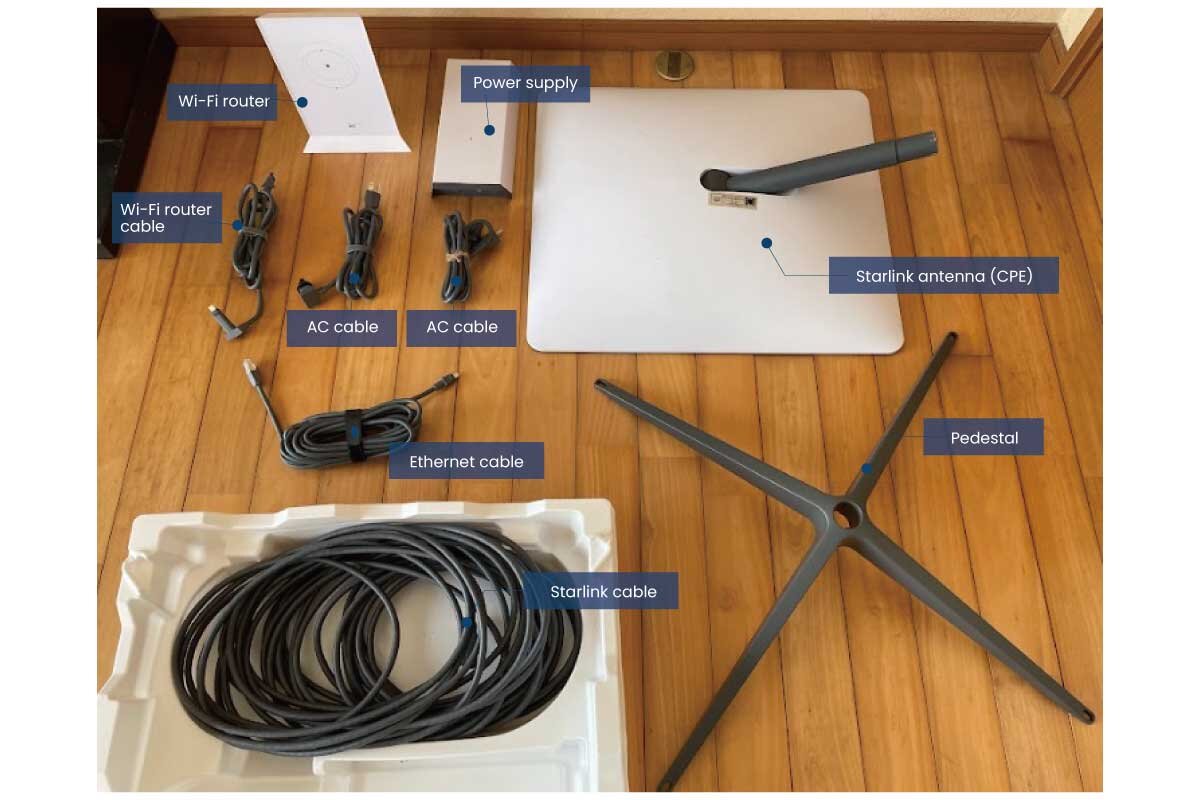
PHOTO: KEY COMPONENTS OF THE STARLINK KIT.
Main components of the package included
- Antenna for the Starlink unit
- Pedestal
- Power supply
- Wi-Fi router
- Starlink cable between Starlink and power supply
- Router cable between Wi-Fi router and power supply
- Two AC cables for Power supply and Wi-Fi router
- Ethernet cable
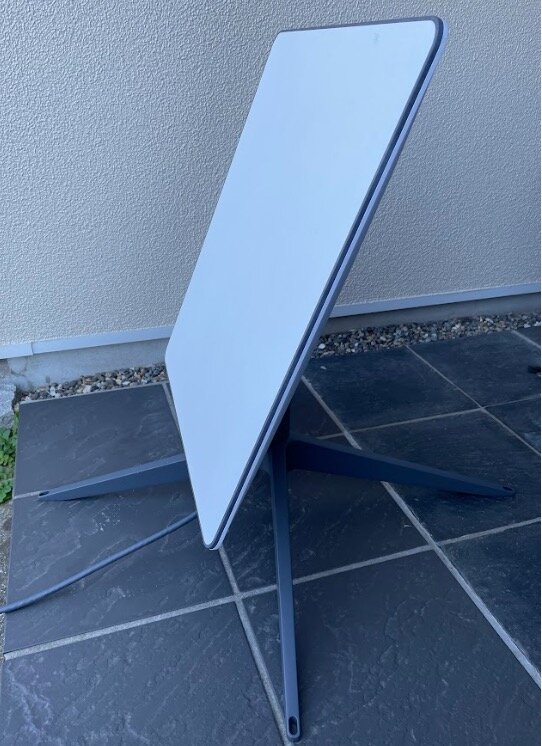
PHOTO: STARLINK CPE (ANTENNA) WITH PEDESTAL AND STARLINK CABLE ATTACHED
The antenna of the Starlink main unit is unexpectedly large and heavy, weighing around 10 kg when the pedestal is attached. The construction of the main unit is very robust for use in harsh outdoor environments. The cables that come with it are also very solid and resistant to the environment, and therefore the cables themselves are of a certain weight.
In the past, I have done DIY installation of satellite antennas for BS broadcasting reception, and perhaps because I had this image in mind, I feel that every part of Starlink is 'heavy'. However, this high-performance antenna is to be installed outdoors, so it is better that it is as sturdy as this.
Connect the Starlink cable to the antenna and attach the pedestal.
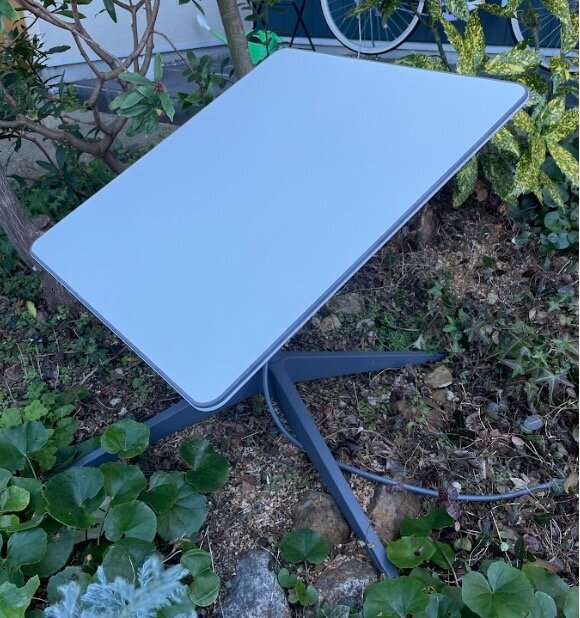
PHOTO: STARLINK ANTENNA (CPE) INSTALLED IN THE SPACE TO THE NORTH OF THE HOME
This is to be installed outdoors. The setup manual said it was to be on the north side of the house with open sky, so I installed it on the north side of the house where there are few obstructions and it is less visible to the public.
When installing BS antenna in the past, it was very complicated to adjust the installation angle of the antenna, but this Starlink antenna is equipped with an automatic directivity adjustment mechanism that made it really easy. The antenna is installed in a location where the sky is as open as possible, and the antenna plane should face north at most. Other than that, it was OK just to place it without thinking too deeply.
The satellite tracking mechanism is truly outstanding: firstly, the antenna orientation is mechanically and automatically adjusted by a motor drive. In addition, there is an electrical fine-tuning mechanism for directivity inside the flat antenna.
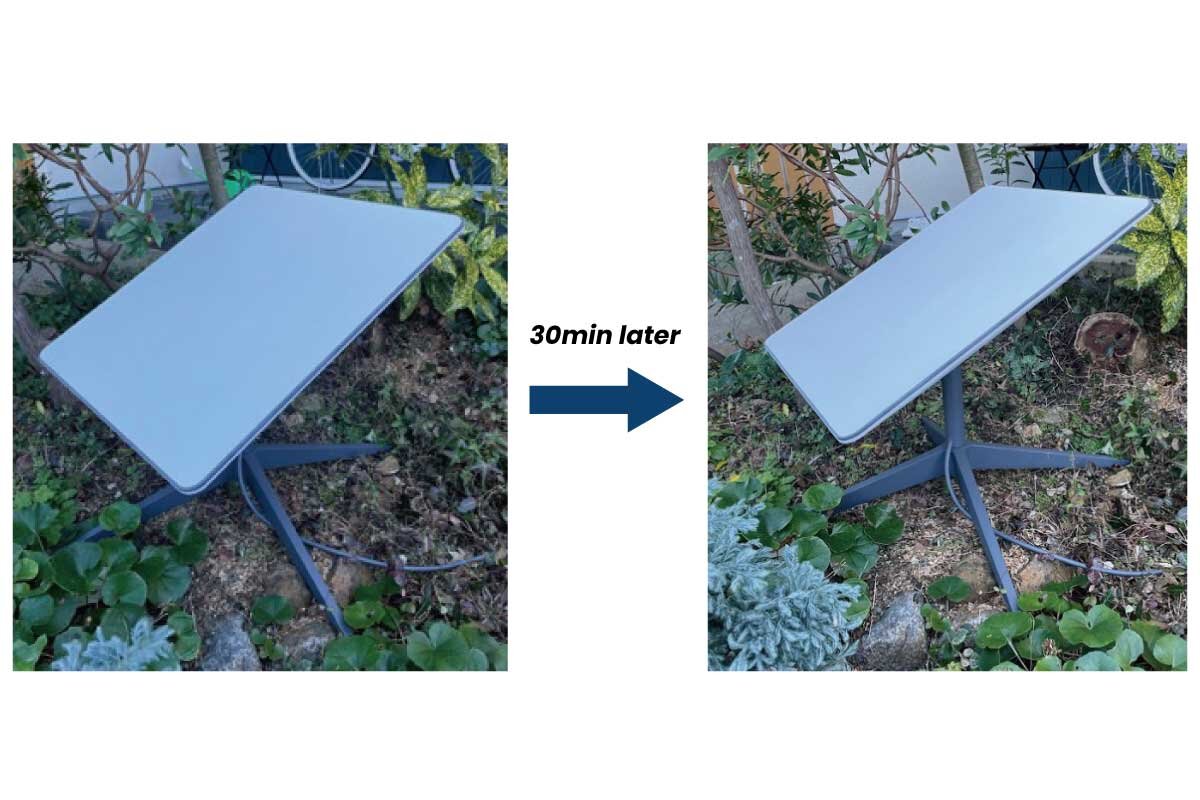
PHOTO: STARLINK ANTENNA AUTOMATICALLY ADJUSTING ANTENNA ORIENTATION.
Starlink is a group of low orbit satellites, so unlike BS broadcasting geostationary satellites, it moves around in the sky. Therefore, such an automatic tracking mechanism is needed on the CPE side.
It is good that the directivity of the antenna is adjusted very precisely, but if you get close to a distance of about 1 m from the antenna and listen carefully, you can hear a faint jittering sound. However, the CPE would normally be installed outdoors and at a high altitude, so this faint noise is hardly noticeable.
The Starlink cable serves as both power and signal line, and a single cable is drawn indoors and connected to the power supply.

PHOTO: PLUGGING THE AC CABLE CONNECTION PLUG INTO THE AC OUTLET OF THE POWER SUPPLY
The power supply is also very robust. It is waterproof and can be installed outdoors. The connection terminals for the various cables enclosed in the Starlink kit are uniquely shaped with a silicon waterproofing mechanism and can be plugged in without the need for tools.
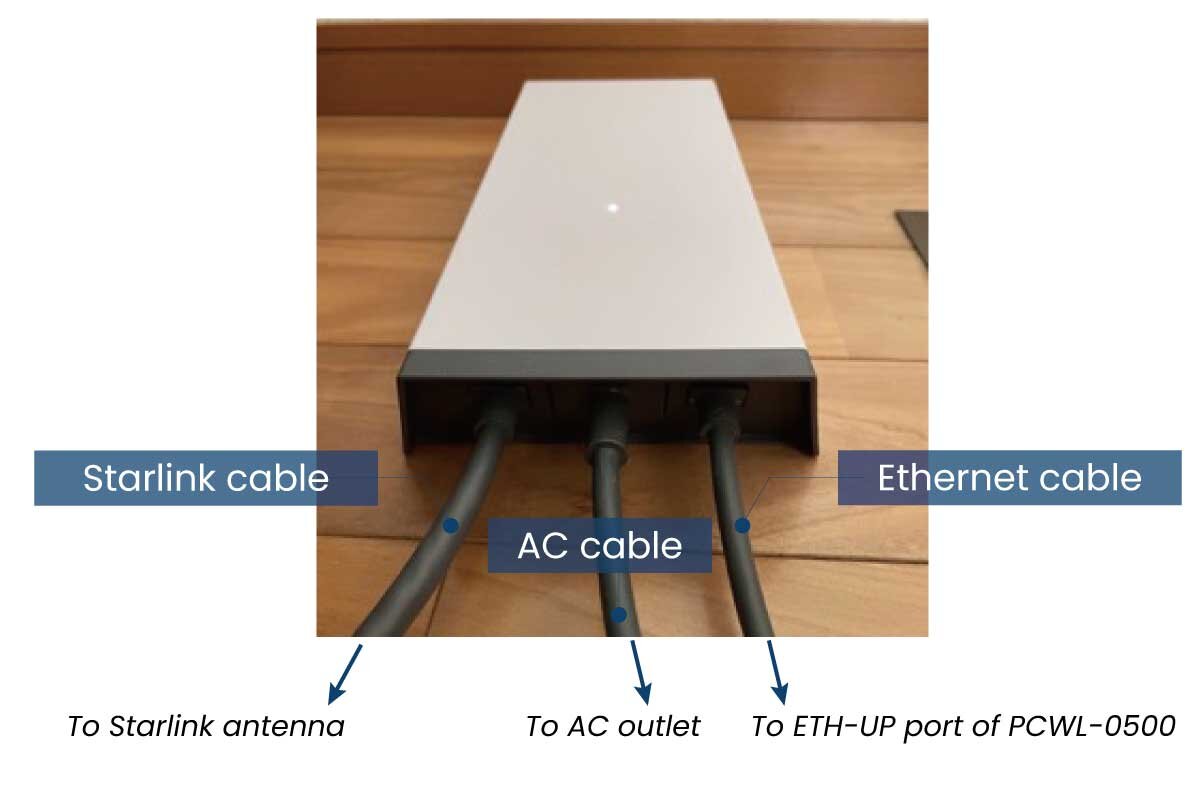
PHOTO: STARLINK CABLE AND OTHERS CONNECTED TO THE POWER SUPPLY.
Connect the power supply with the Starlink cable, power cable and, in this case, the Ethernet cable to connect to the PCWL-0500.
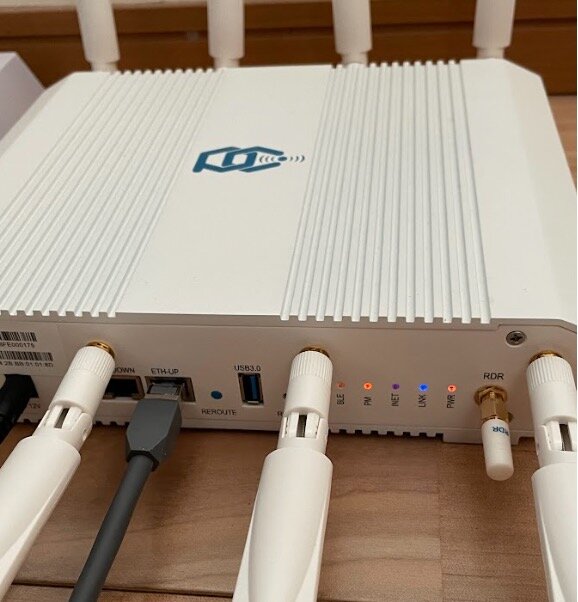
PHOTO: STARLINK CABLE AND OTHERS CONNECTED TO THE POWER SUPPLY.
The other end of the Ethernet cable is an RJ45 normal wired LAN terminal. Connect this to the ETH-UP port of the PCWL.
Once both Starlink and PCWL are connected to the power supply, they are ready to go. We expected the power supply's Ethernet port to have a PoE power supply function, but unfortunately it did not; many of today's enterprise Wi-Fi APs, including the PCWL-0500, have a built-in PoE power receiving function, and we would have liked it to have a PoE power supply function. (In fact, the Wi-Fi router included in the Starlink kit also required a separate power supply.) Expect improvements in the future.
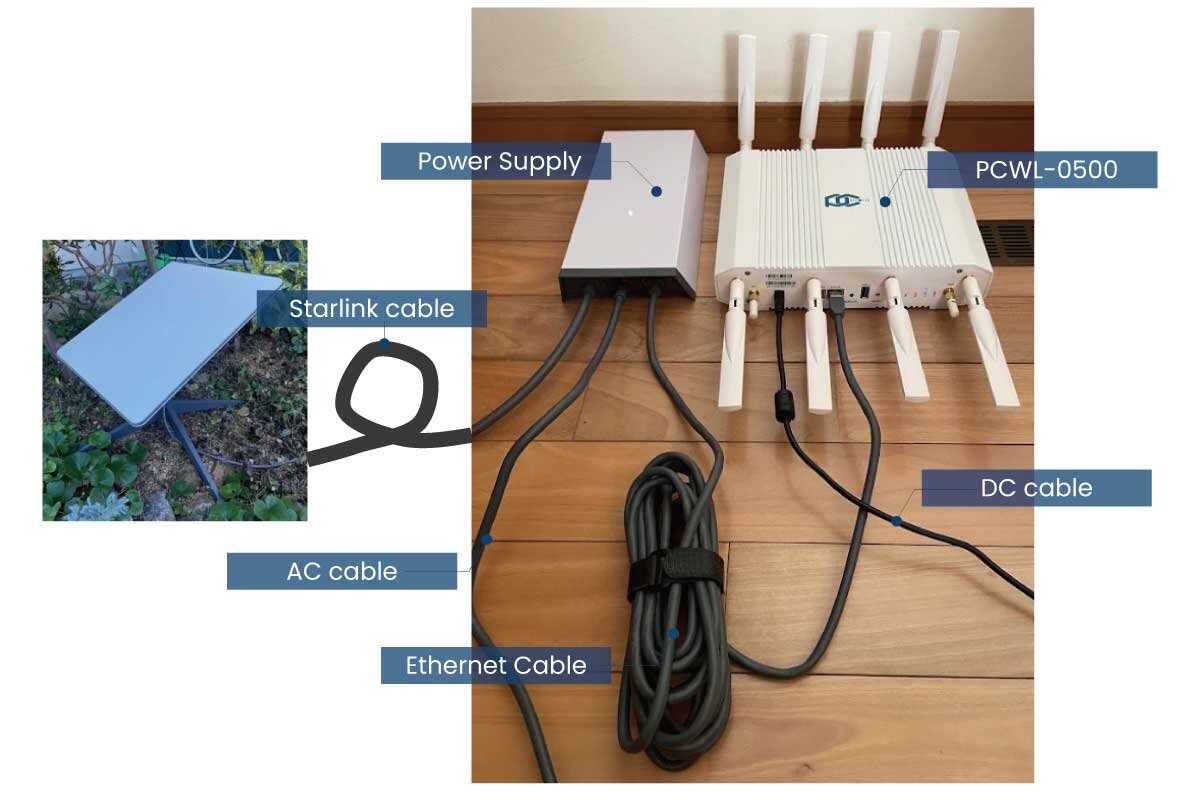
PHOTO: STARLINK POWER SUPPLY AND PCWL-0500 WITH THE SET-UP COMPLETED; THE CPE IS CONNECTED TO THE POWER SUPPLY WITH A SINGLE STARLINK CABLE.
Starlink starts acquiring satellites immediately after power-on. It took approximately 10 minutes until the link with the satellite was established and communication started. This set-up time seems to depend on the time of day when the power is switched on, the installation location and the installation environment.
To set up Starlink, download the dedicated smartphone application when using the Wi-Fi router included in the Starlink kit. In this case, our product PCWL-0500 is used as the Wi-Fi router, so login using a browser from the Starlink account portal and access the management screen.
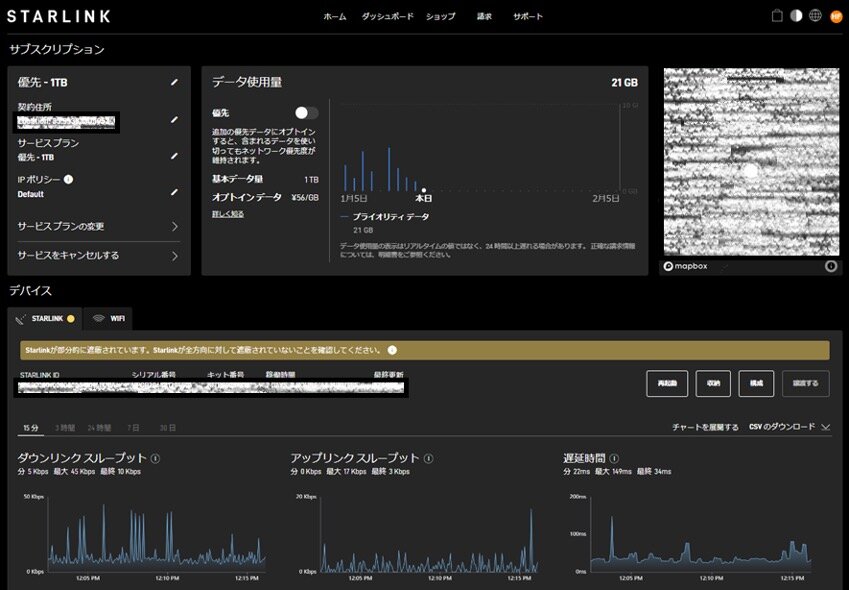
FIGURE: STARLINK ACCOUNT PORTAL DASHBOARD.
It seems that the location where Starlink is used must be registered as accurately as possible. Please note that if there is too much of a discrepancy between the registered location and the actual location of use, satellite communication will not be activated.
From the location where I installed the Starlink this time, the roof of my house slightly blocked the view of the sky and alerts were constantly displayed.

FIGURE: ALERT MESSAGE WARNING THAT THE STARLINK ANTENNA IS SHIELDED.
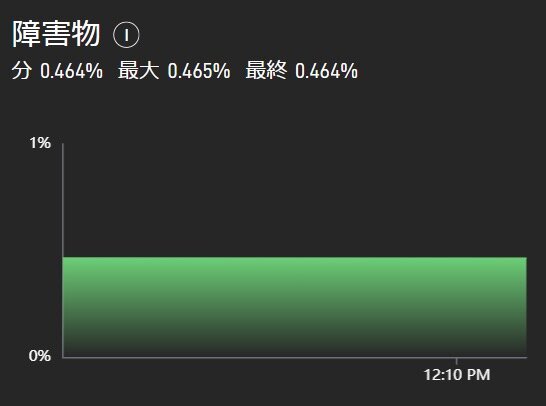
FIGURE: MONITORING GRAPH SHOWING THE DEGREE OF IMPACT CAUSED BY OBSTACLES.
Starlink constantly monitors the degree to which obstructions affect communications, and in my environment this time it was always around 0.5~1%.
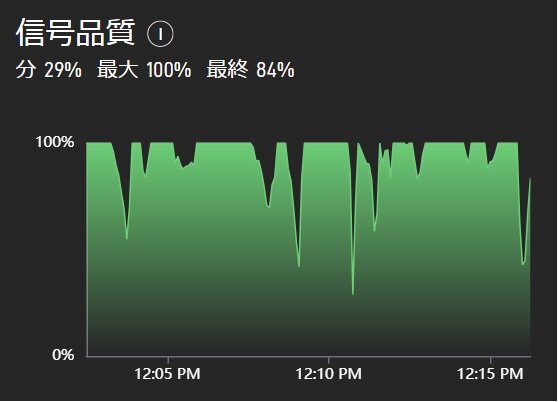
FIGURE: MONITORING GRAPH SHOWING THE DEGREE OF SIGNAL QUALITY.
Looking at the signal quality, the situation was that the quality sometimes deteriorated.
Signal quality could be improved further if the antennas were placed higher, as this would ensure a more open sky from the CPE. This is an experiment, so this is good enough for this time.
The only work done on the Starlink account portal was to check the location of the CPE, check the communication status with the satellite and check the quality of the CPE, without the need to do any configuration.
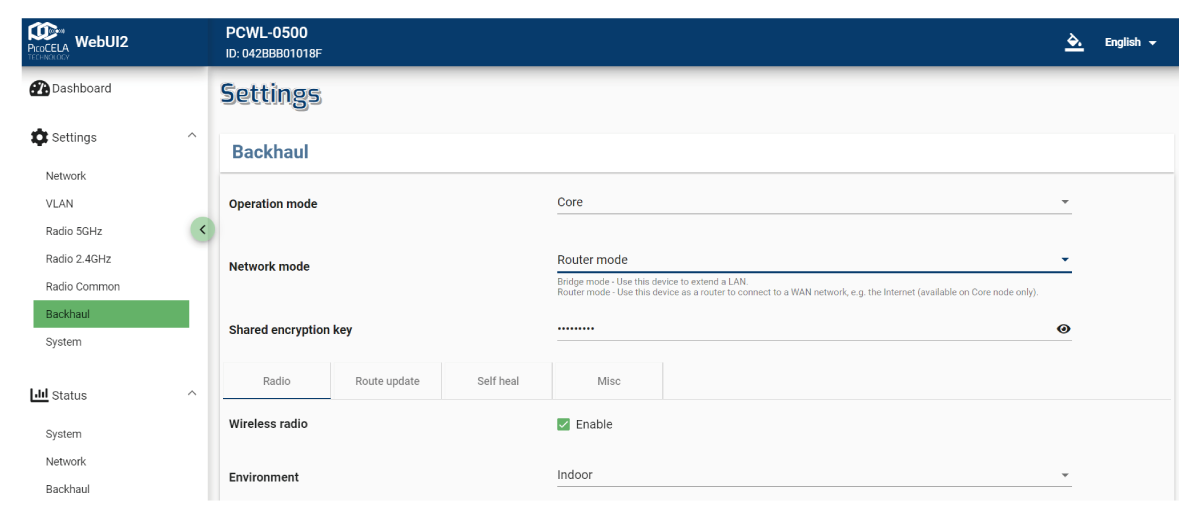
FIGURE: CONFIGURATION OF PCWL-0500 WHEN CONNECTING TO STARLINK.
The next step is to configure the PCWL side: for the connection to Starlink, the PCWL must be set to core mode and router mode. From the factory reset, access the PCWL webUI page and configure both modes as shown in the figure.
This is all that needs to be set up on the PCWL side to connect to Starlink from the factory. It's easy.
Registration and activation in PicoManager® went smoothly; if the SSID or passphrase needs to be changed from the initial setting, this can be done via the PCWL webUI page or PicoManager® as appropriate.
The Starlink CPE allocates an upstream IP address to the PCWL in router mode by DHCP, but depending on the Starlink subscription plan, it may be possible to allocate a fixed global IP address, in which case the WAN-side IP address allocation method on the PCWL is changed from the default DHCP to static IP address allocation.
The PCWL is operated in router mode, so multiple Wi-Fi devices can be connected to the PCWL and connected to the Internet via Starlink.
I evaluated the throughput and found that the maximum downlink speed was just over 300 Mbps and the maximum uplink speed was around 30 Mbps. The subscription of Starlink I signed up for this time was a business priority plan, which provides priority traffic flow with a data cap of 1 TB per month; once the 1 TB is exceeded, the satellite link is not allocated priority but unlimited usage is provided. By the end of this experiment, the total usage was around 20GB, so this is throughput with priority usage.
The note that I want to express is the delay performance. The response is very good, almost always with a round trip delay of around 50 msec. I was surprised by this. The throughput is also very pleasant. I felt that this could be a good alternative to a fibre connection.
I installed and used the system for about a week. Although I did not feel the effects of clouds and rain as much, in my setup environment this time, I experienced a 10-second disconnection approximately once every 20-30 minutes. This was not due to Starlink, but to some obstructions in the sky direction from my CPE installation, i.e. the CPE was not optimally located. However, I found this to be sufficient for normal office tasks other than real-time communications such as web conferencing.
The Starlink CPE is quite a power hungry device with a power consumption of just over 100W. It is likely to be battery-powered for temporary outdoor networking, in which case it would be better to have a high-capacity battery ready.
How did you feel about the above?
In order to give readers a realistic experience of the process of connecting the Starlink to the PCWL-0500, I have tried to report in some detail. This setup took about 30 minutes. It was really easy.
The set-up manual that came with the Starlink was very clear and illustrated the procedure - if you have any experience of building IKEA assembled furniture, you may recall the assembly instructions that come with it.
By utilising enterprise wireless mesh, the essence of PicoCELA, multiple PCWLs can be linked via wireless mesh to create a wide-area Wi-Fi space without LAN cabling. With Starlink, WAN lines can also be secured without LAN cabling, enabling a variety of ad hoc Wi-Fi solutions with extreme mobility.
In the future, we would like to use this Starlink to link up with several PCWLs and conduct various experiments somewhere else. Stay tuned for further information.